
Chocolate 3d printers to 3d print chocolate
| Product name | Build volume (mm) | Dimensions(inches) | Product link |
|---|---|---|---|
| WiibooxSweetin Intelligent Sliver | 90x 90 x 70 | 15x7.6x 16.5 | View on Amazon |
| FoodBot Food 3D Chocolate Printer | 150x150x70 | 16.5 x 15 x 15.8 | View on Amazon |
How to 3d print chocolate
What is only perceived as fantasy back in the day is becoming a reality gradually, which is the ability to 3d print your own delicious customized chocolate with the newly developing chocolate 3d printers. You might have taking a bit of those creamy delicious 3d printed chocolate at Hershey’s is time to try it at home or incorporate into your business.
It is noteworthy that the 3d printing in chocolate has its special 3d printer that allows printing in chocolate.
The regular 3d printer for hobbyist, home use, industries are not made to print in chocolate, in other words, you have to purchase the chocolate 3d printer to 3d print in chocolate.
They are not difficult to operate. If you are conversant with the FDM/FFF technology you won’t have a difficulty operating the chocolate 3d printers as their modus operandi is similar to the FDM extrusion technology, but instead of using the plastic material, they use paste-type materials such as chocolate, butter and cream.
Since the invention of the chocolate 3d printers chocolatiers and chocolate makers have begun to adopt the 3d print chocolate to make chocolate.
Although the chocolate 3d printers may not be suitable for mass production, but, it is definitely excellent for mothers to make custom chocolate and for chocolate makers and chocolatiers to add a bit of creativity to their chocolate bar and confectioneries, hence, rise above competitors.
The major players in the chocolate companies such as Nestle, Hershey Foods coupled with certain small and medium scale business are already integrating the chocolate 3d printers into their business, and their customers love every bit of the innovative 3d printed chocolate.
Nestle especially has been into chocolate 3d printing and food 3d printing since 2013, and Mars are massively considering the 3d printing into their business too.
The 3d printing used by these top companies may not be suitable for home use due to its large size.
However, you can get a compact size chocolate 3d printer you can incorporate into your small or medium scale business as a chocolatier, baker and chocolate maker for your customers to have a feel of the custom 3d printing chocolate. Individuals can likewise use the chocolate 3d printer to make custom chocolate bar at home.
The chocolate 3d printers are compatible with the CAD software, which is used to create the model, and they are likewise compatible with the 3D model file format STL.
The traditional method VS chocolate 3d printing of making bar chocolate
The chocolate is made by the mixture of different ingredients, which includes the cocoa, cocoa butter and sweetener.
The traditional bar chocolate was made by molding the chocolate, but before molding the chocolate would have been tempered.
Molding gives chocolatiers, and bakers to make different shapes of chocolate. The molding involves four processes which include:
- Filling of the mold with chocolate with a ladle or spoon
- Forming a shape with the chocolate inside the mold, this involves hitting the mold lightly on the table, then placing the mold on cool flat surface to harden the mold.
- Then the last process involves hardening the mold by placing it in a cold cupboard or refrigerator. And you have to be an expert to get the best result or at best you must be highly skilful.
The chocolate 3d printer on the other hand makes it easy to produce the chocolate bar with little or no stress. All it takes is to have your 3d model ready with the CAD package, feed the filament into the printer and send the file into the printer to start printing, and then watch as the custom chocolate begins to develop on the build platform.
How the chocolate 3d printer works
The chocolate 3d printing is a new niche in the 3d printing world to make 3d print chocolate also certain food such as paste and pizza.
The chocolate 3d printer works similar to the FDM (Fused Deposition Method), the only tangible difference between the two is that the chocolate 3d printer does not use any of the FDM filaments such as the PLA, ABS, PETG, and PC. The chocolate 3d printer use chocolate.
Just like the FDM printer, the chocolate 3d printer also consist of the build plate and printer head or the extruder, but syringe like extruder.
And the modus operand is also the same. The hot extruder moves to and fro around the build plate and deposits the molten chocolate in successive layers until the object is formed on the build platform.
But before you move to this process, you must have designed the chocolate model with your perfect CAD package such as Autodesk, solid works or Blender, and save the file in STL.
The plastic printing and the chocolate printing
Out of the traditional printing technology, which includes SLM (Selective Laser Melting), SLS (Selective Laser Sintering), FDM (Fused Deposition Modeling), and SLA (Stereolithography), only the 3D printing extrusion technology is similar to the chocolate 3d printer except for the chocolate 3d printer extruder that is syringe like, as well as, the difference in 3d printing material.
Why is the extruder syringe like? The chocolate is too soft for the motor to drive it and the extruder to extrude the chocolate, however, this mechanism is great for plastic extrusion.
The chocolate 3d printer instead stores the chocolate in a cartridge and extrude through a syringe, and the 3d printer keeps heating the chocolate to be easily extrudable.
Similarly with FDM technology, you also need to experiment with various materials and conduct thorough investigation to pinpoint the best blend of chocolate material that is perfect for the printer.
For instance, the viscosity and property of these materials differs, as the dark chocolate differs from the white, the white also differs from the milk chocolate, and vice versa.
In 3D plastic and metal printing there is no limit to the designs you can achieve compared to the 3d chocolate printing that the design is restricted by the height and support structure.
Chocolate printing can’t go as fine as plastic printing will go. For instance, plastic printing can go as fine as 0.02 mm while chocolate printing is 0.4 or 0.8 mm thick.
And unlike plastic printing, chocolate is not compatible with ultrafine nozzle because chocolate is not a polymer, it is made from crystal that tends to compress when subjected to high pressure.
Benefits of chocolate 3d printing
Creativity
If you can imagine it; the chocolate 3d printer can print it. The traditional mode of making chocolate bar limits the full expression of one’s creativity, because creativity with the chocolate mold is not a child’s play, and moreover, there is a limit to the design you can get from hand sculpting and molding.
But with the 3d printing you can put your creativity into full expression as it allows you to have a perfect print of your design in shapes and style, just the way you want it!
Just get CAD software and pour in your creativity into it and let the 3d printer do the printing in chocolate!
Time saving
The 3d chocolate printing gives you an ample of time to engage other things while the 3d printing is working. Moreover, it doesn’t take forever to finish with the printing.
Customization
Chocolate 3d printing allows the users to customize their chocolate as it suits them. You can use the simple CAD to customize the chocolate to reflect your mood or a special event.
You can have a chocolate custom design for your birthday, wedding, and any other special events. Here is a design tip for you- a heart shape in chocolate to tell your love.
The Hershey’s chocolate centers are making use of the machine big time to create customized chocolate for their customers.
Customers can take pictures and have their image on the chocolate- it doesn’t get better than this! And this is just a tip of the iceberg if you consider chocolate 3d printer to make chocolate.
Step by step procedure on how to 3d print chocolate
This step by step guide will help you get started even if you are still new to the 3d printing world, and it won’t just benefit the 3d printing community, but also the chocolatiers, confectioners, and the bakers.
What you need
- CAD software or readymade model
- Slicing software
- Chocolate 3d printer
Step 1: create a model
Even if you are not an artist, you have little or no choice here for the 3d printer is designed to process out a 3d model.
So get a CAD software package and start designing- they are however easy to use. There are various CAD packages you can choose from. They include Google sketch up, blender AUTODESK, and solid works.
Moreover, to design a chocolate model only requires a simple CAD design. You don’t have to go complex, and besides, the chocolate 3d printers cannot handle heavy model with difficult angles and lots of overhangs because it has no support structure, so it is best to avoid such models.
Once you are through with the creation of the model, you can save the file and export in STL file.
Better still, you can make use of the free pre-designed models provided by the brand of your chocolate 3d printer. And don’t worry if you can’t make the complex design to impress your customers or loved ones, since chocolate 3d printing is still a new innovation the customers or the individual will found the design lovely.
Any design on chocolate either simple or complex is always fascinating. Just start with the simple shapes, and then walk your way up to complex shapes.
Step 2: slice the model
The STL format in which you export the model is still not readable by the 3d printer, so there is a need to slice up the model to convert it to g-code file.
The g-code file contains the set of instructions the 3d printer needs to print the digital file accordingly. You can create the g-code file by slicing the model with the software such as cura and simplify 3D.
And you can likewise use the 3d printer brand slicer software if provided. The slicing software allows you to slice the model then save the file as g-code file, which is the executable file the 3d printer understands.
Step 3: make sure the printer system is leveled
You have little or no manual leveling to do if the 3d provides assist in the leveling like the chocolate 3d printers featured here. Accurate leveling is important to the end result of the print!
Step 4: feed the tempered chocolate into the syringe to be loaded into the 3d printer.
It is straightforward to load the chocolate into the 3d printer if the 3d printer has a built in tempering machine, which means you don’t have to temper the chocolate either through Chocolate tempering machine or by hand before you load it into the 3d printer.
Step 5: then send the file to the 3d printer
You can transfer the file to the 3d printer via the USB port, WI-FI, flash drive or SD card depending on the 3d printer compatibility.
Step 6: once the printer system heats up, the chocolate will begin to develop on the build platform.
Step 7: remove the chocolate.
Tips on how to 3d print chocolate
- If the 3d printer does not have a built-in tempering machine, which is most likely if it is desktop like. That means you have to you use of the Chocolate tempering machine to temper the Chocolate or by hand tempering. The tempered is chocolate is thick like toothpaste
- There is no support structure or raft for the chocolate 3d printing, so be mindful of overhangs and steep angles when designing the model.
- If you are not proficient in 3d design you can start with simple design. Simple designs are fantastic on chocolate, but, that does not stop you from trying out complex models as time goes on.
- Avoid models that involve severe angles and overhangs because there is no support structure for 3d chocolate printing unlike plastic printing.
- If your room temperature is at 40 to 50 degree Celsius it would be almost impossible to print in chocolate, because chocolate especially dark chocolate may lose it’s tempering when expose to heat up to 35 degree Celsius not to mention 40 degree Celsius.
To achieve the best result in this atmospheric condition you have to consider installing an Air Conditioner into the room to maintain a room temperature of 21 degree Celsius- this is far better than the 40 degree Celsius.
- You can reduce the printing speed to help with the areas of slight overhang and steep angles as it gives the chocolate more time to dry, hence, the next layers are built on hardened layers.
- Make sure you refer to your brand 3d manual for other tips as it pertains to the use of the machine, to achieve optimal result with the 3d printer.
Moreover, since the chocolate 3d printing is still evolving your brand may include a new feature that is not present in other chocolate 3d printers or not mention in this article or a tip mention that may not be applicable to the 3d printer such as the step 4.
3d printers for 3d chocolate printing
Though chocolate 3d printers are still relatively new in the market compared to the regular 3d printers, you can check out this 3d printers has enthusiast individual, baker or chocolatier to start printing in chocolate!
WiibooxSweetin Intelligent Sliver Home DIY 3D Desktop Food Chocolate Printer 30ML

The wiibooxSweetin intelligent 3d printer enable users to have access to wide range of chocolate design possibilities as it allows you to turn your imaginative ideas to cool and delicious eating with ease of operation thanks to the 2.8 inch full-touch color screen, which makes it easy to get the printer into full swing, and it provides automatic leveling.
You have less to worry about designing your model with the numbers of chocolate models that comes with the 3d printer to aid you in starting with the chocolate 3d printing, and if the design doesn’t cut it with you, you can create yours with either Autodesk, blender or any other modeling software.
It is suitable for the loving mummies to surprise the family with beautifully designed tasty chocolate. It is also perfect for bakers, professionals.
It can be used in the family, and for businesses in restaurants, shops, desert/baker shops, and it works with common chocolate.
The 3d printer is in two categories based on the capacity of chocolate tube, and they slightly differ in price. The 60 ml can work longer and print more objects than the 30 ml. So, you might want to opt in for the 60 ml if your need demands it, and if it meets your budget.
And it is straightforward to use:
- Load chocolate into the ingredients tube
- Preheat the chocolate
- Get the model and make sure you convert the STL digital file to g-code via the slicing software that comes with the machine. With the slicing software you can set the parameters of the models such as the layer thickness, height as it suits you, and the parameters are important for the quality of the print.
- Then save the g-code file in USB drive then upload to the printer
- Then load the chocolate tube into the printer and select your favorite temperature level from the 32 to 37 degree Celsius and start printing!
Features include:
- Product Dimensions: 15×7.6x 16.5 inches
- Build volume: 90mm x 90mm x 70mm
- Weighs 22.1 pounds
- Connectivity- U DISK
- Extrusion Head Temperature: 32-37 ℃
- Supported format: STL and g-code
- Printing Speed: 15-70mm/s
- Nozzle Diameter: 0.6mm/0.84mm
- Display Screen: 2.8 inch full-color touch screen
|
PROS
|
CONS
|
|
|
FoodBot Food 3D Chocolate Printer with App Support, for Shop, Restaurants, Chefs, housewives. (60ml)
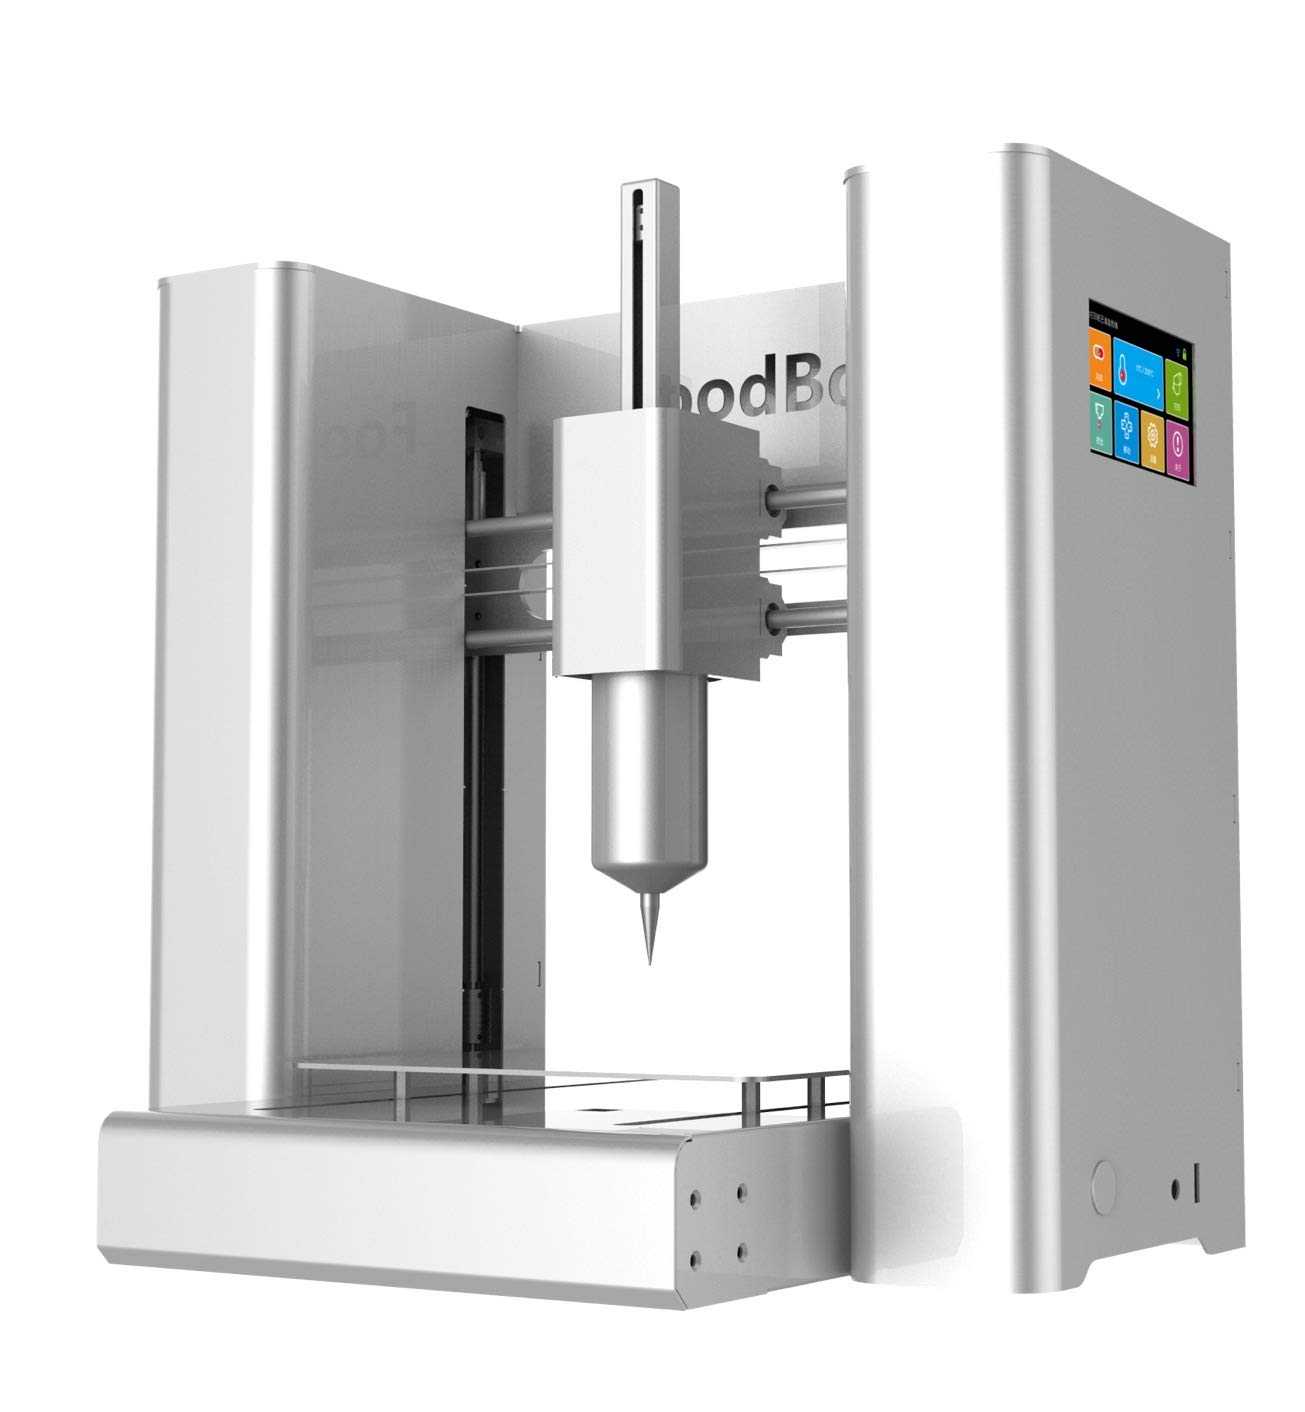
FoodBot chocolate 3d printer is versatile and it is perfect for every use. Whether for use in the home kitchen, restaurants, café, desert/bake shop, also for education purpose.
It is not just suitable for chocolate printing, but also biscuit, cheese, jam, mashed potatoes, creamy candy, bean paste up to 10 ingredients! It is also suitable for rapid molding.
This indeed is a chocolate 3d printer for baker, pastry chef, cooking enthusiasts and creative food lovers etc.
You can begin the chocolate 3d printing with the chocolate modes that comes with it, and you can likewise design your own model and save it in the STL file then convert it to g-code via the slicing software.
It features an intuitive 4.5 touch screen to make the operation of the printer easy coupled with the support it provides for the leveling. It detects and adjusts the height between the extrusion head and the printing plate.
This printer has the capability to handle all of your imaginative designs. Besides the U-drive to connect to send file to the printer, it also supports WI-FI connectivity, and likewise has an app support. It comes with pre-heat machine and ingredients tubes.
Features include:
- Product Dimensions: 16.5 x 15 x 15.8 inches
- Weighs 48.5 pounds
- 4.5 inch touch screen
- Build volume: 150x150x70mm
- Auto leveling
- Supported file format: STL/G-code
- Nozzle Diameter: 0.4mm-1.55mm Nozzle
- Printing Speed: 15-70mm/s
- 60 ml capacity
|
PROS
|
CONS
|
|
|
Conclusion
The chocolate 3d print has come to stay since its invention as manufacturing companies are considering making chocolate 3d printers more popular and to be available for chocolate enthusiasts in good number for them to make their own chocolate with ease.
Major and minor chocolate companies are beginning to use the chocolate 3d printers massively and those yet to follow the trend are considering the possibility of incorporating into their business.
The 3d chocolate 3d printing can help cut cost, saves time, at the same time, provide a quality result better than what handmade chocolate offers.